|
|
|
 |
|
 |
| |
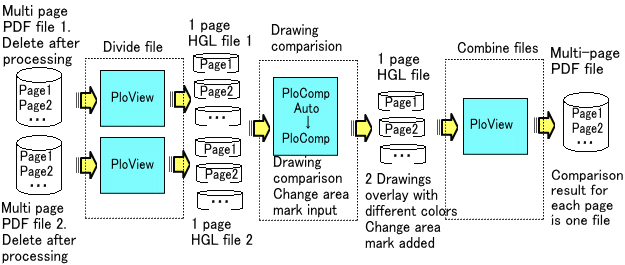
A single product drawing consists of many drawings and is generally stored
in a multi-page PDF file. When the design of the drawing is changed, it
will be a lot of work to compare all the drawings of the old and new drawings
and mark the change accurately. This HP explains PloCVAuto, which automatically
compares a large number of drawings contained in two new and old multi-page
files.
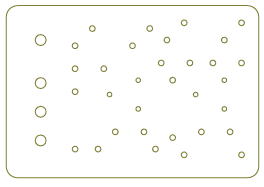
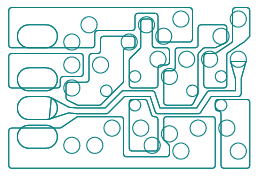
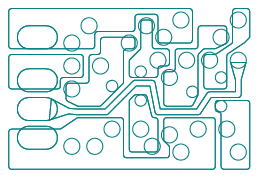
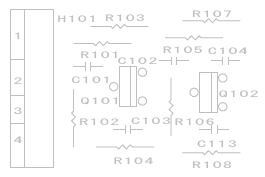
Drawing
comparison sample
|
| |
|
|
 Index Index |
|
・Outline
・Simple preparation
・PloCVAuto program starting
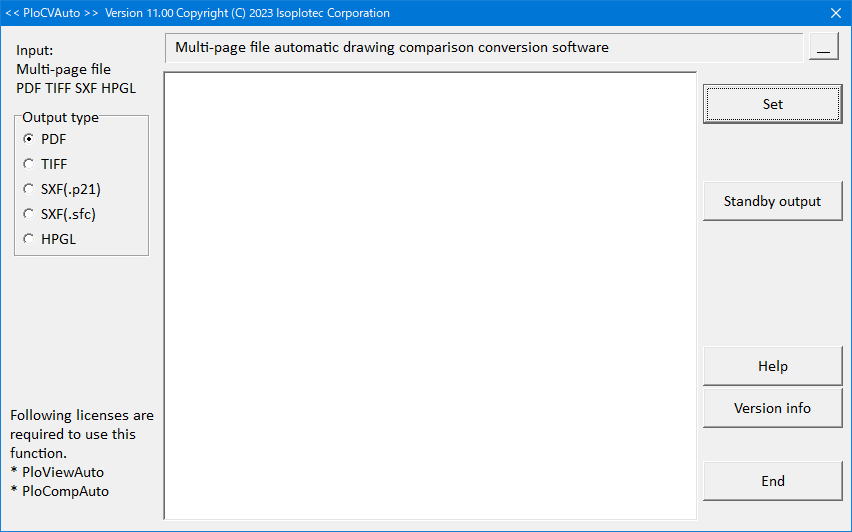
・Set
・Input/output files
・Standby output
・Error file
・Operating conditions
・Licensing fee
・Flow to trial, order, and use
・Regular preparation
・Latest upgrade history
・Download
・Contact us |
|
|
|
Outline
|
|
This program automatically performs drawing comparison and continuous conversion
of multi-page files in the following formats.
Input:
PDF,TIFF,SXF(p21,sfc),HPGL
Output: PDF, TIFF, SXF (p21, sfc),
HPGL
Start each program manually in advance and configure the
settings.
When you press the "Standby output" button of PloCVAuto, it will
monitor until the old and new multi-page drawing files enter the new and old
folders respectively. Once the files are in, the drawings are overlaid with
different colors for each page, the drawings are compared, changed area marks
are added, and a multi-page file of the specified file type is output to the
output folder.
The old and new input files are deleted when the output is
completed.
This program is free, but PloCompAuto and PloViewAuto licenses are
required.
The necessary programs are as follows.
Please refer to the operating conditions for the required program version.
*PloCVAuto
*PloCompAuto
*PloComp attached to PloCompAuto
*PloView attached to
PloViewAuto
The processing flow of PloCVAuto is shown below.
Return to Index |
| |
|
| |
Simple preparation |
| |
Please install the following necessary programs in advance.
(1)
PloCVAuto
(2) PloCompAuto
(3) PloComp attached to PloCompAuto
(4)
PloView attached to PloViewAuto
Prepare in a simple way to use PloCVAuto.
For simple preparation, simply
replace the configuration files that have been set in "Regular Preparation" with the PloView and
PloComp configuration files.
Here's how.
Step-1 Replace the setting
files of PloView and PloComp with the setting files that have already been
set
Note: <username> is your Windows account name.
(1)
Replacing the PloComp setting file
Switch to the next folder in
Explorer.
C:\Users\<username>\AppData\Local\Isoprotec\PloComp
Please delete
the following files and change their extensions.
Delete
: PloComp0.par
Change extension : PloComp0.par2 -->
PloComp0.par
Delete : plotter2.par
Change
extension : plotter2.par2 --> plotter2.par
(2) PloView setting file
replacement
Switch to the next folder in Explorer.
C:\Users\<username>\AppData\Local\Isoprotec\PloView
Please delete
the following files and change their extensions.
Delete
: PloView.par
Change extension : PloView.par2 --> PloView.par
Delete : plotter2.par
Change extension :
plotter2.par2 --> plotter2.par
After completing the replacement,
please follow Step-2 and 3 below.
Step-2 Prepare sample
files
When PloCVAuto is installed, sample files are included
below.
(1) Comparison source multi-page PDF file 1
C:\HpglData\Data\demopwb1.pdf
(2) Comparison destination multi-page PDF file
2
C:\HpglData\Data\demopwb2.pdf
(3) A batch file that copies (1) to
(4) and (2) to (5) to the file name "demopwb.pdf"
C:\HpglData\Data\CopyFileDataToData1_2.bat
(4) Folder containing input
file 1 (comparison source)
C:\HpglData\InData1
(5) Folder containing
input file 2 (comparison target)
C:\HpglData\InData2
(6) Folder
containing output files
C:\HpglData\OutData
Copy sample files
to input folder
Double-click the following batch file in Explorer.
C:\HpglData\Data\CopyFileDataToData1_2.bat
Confirm that there are files
below, and open them with Adobe Acrobat
Reader.
C:\HpglData\InData1\demopwb.pdf C:\HpglData\InData2\demopwb.pdf
Page1 Page1
Page2 Page2
Page3 Page3
Step-3・・・Set up PloCVAuto and check if it works
normally
(1) Start PloCVAuto

(2) Press the "Set" button.
Check if the "PloCompAuto program name" file
exists
Check if the file of "PloViewAuto attached PloView program name"
exists
Set "Waiting time for output"
The initial value is 1
minute.
If set to 0 minutes, the standby time will be 2 seconds.
0
minutes is good for testing, but it is recommended to use a longer time in
actual operation because it wastes the CPU.
Check if the file exists in
"Comparison file 1"
Check if the file exists in "Comparison folder
2"
Check if the folder with "Output destination folder name" exists
Press
the OK button
(3) Select "PDF" for "Output type" on the main screen
(4) Press the "Standby
output" button
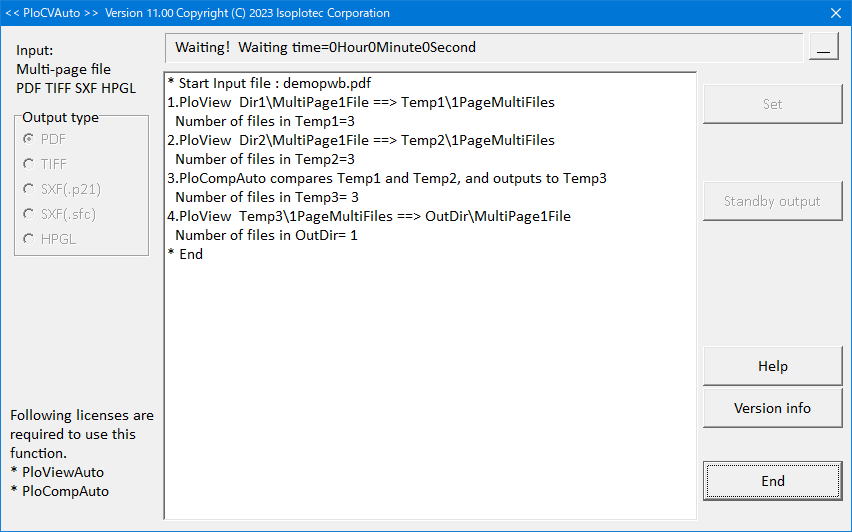
(5) Confirm the output file
When "* End" is displayed on the main screen,
press the "End" button.
An output file "C:\HpglData\OutData\demopwb.pdf" is
created.
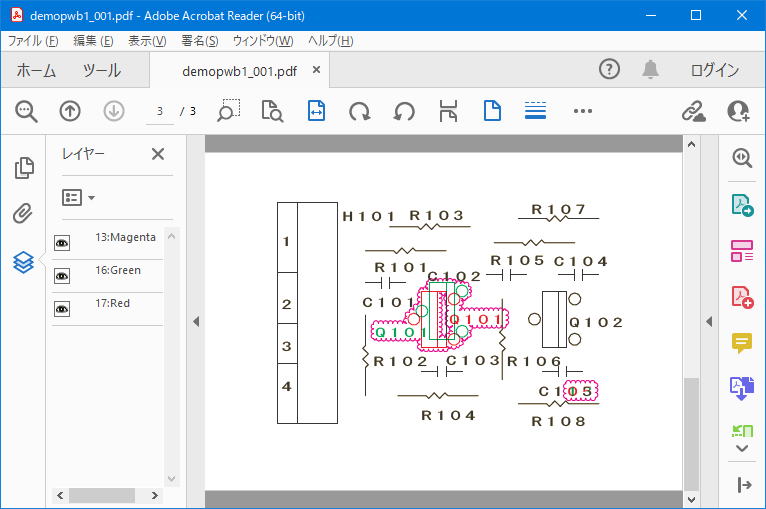
Open this file with Adobe Acrobat Reader.
On each page, you can
check the changed parts of the old and new drawings in different colors, and you
can also check the cloud mark in that place.
Note: To check mixed colors in
Acrobat Reader, start Acrobat Reader, select the Edit-Preferences menu, select
"Page Display" under Category, and set "Use Overprint Preview" to "Automatic" or
"Always ”.
(6) Check if other output TIFF, SXF (.p21), SXF (.sfc), HPGL are output
normally
Output the operations of Step-2, and Ste-3 (1), (3), (4), (5) except
(2) by changing the "Output type" on the main screen.
Check the output file
with PloView.
Return to Index
|
| |
|
| |
PloCVAuto program starting |
| |
How to start PloCVAuto is shown
below.
--------------------------------------------------
*
Start in interactive mode
Click the "Start" button and select the "All
Programs" "PloCVAuto" menu. The PloCVAuto main screen is displayed, and the
processing contents are specified through dialog.
32bit
OS
"C:\Program Files\Isoplotec\PloCVAuto\PloCVAuto.exe"
64bit
operating system
"C:\Program Files
(x86)\Isoplotec\PloView\PloCVAuto.exe"
The PloCVAuto main screen is
displayed, and the processing contents are specified through
dialogue.
---------------------------------------------------
* Start in standby output mode from the command line
Issue the
following command from the Windows command prompt, or prepare a batch file
containing the following command and double-click the batch file in Explorer to
start it.
Specify the parameters in the order described here.
Parameters
after parameters can be omitted, but parameters before them cannot be
omitted.
If you omit the parameter, the last used parameter is
adopted.
The folder name with PloCVAuto.exe is omitted below.
Display
the main screen and start with the "Standby output" button
pressed
"PloCVAuto.exe" [/a [/oT [Comparison file 1 [Comparison file 2
[Output destination folder name]]]]
Iconize and start with the
"Standby output" button pressed
"PloCVAuto.exe" [/b [/oT [Comparison file
1 [Comparison file 2 [Output destination folder
name]]]]
/a
The operation is the same as pressing the
"Standby output" button on the main screen at the same time as
starting.
/b
Same as /a except the program is placed in the
taskbar and the dialog is not displayed.
/oT
It is the same as
specifying "Output type" on the main screen.
However, "T" is one of the
following characters.
PDF output : "/op"
TIFF output
: "/ot"
SVG (.p21) output : "/os"
SVG (.p21) output :
"/ov"
HPGL output : "/oh"
Comparison file 1
It is the
same as specifying "Comparison file 1" in the setting
dialog.
Comparison file 2
It is the same as specifying
"Comparison folder 2" in the setting dialog.
Output destination folder
name
It is the same as specifying "Output destination folder name" in the
setting dialog.
Return to Index |
|
|
|
Set |
|
Sets automatic processing parameters.
(1) Input/output file type
setting
* Type of input file
You can select from PDF, TIFF, SXF
(.p21), SXF (.sfc), HPGL.
The type of input file is determined by the
extension of the file name specified in "Comparison file 1" by pressing the
"Set" button. The extensions that can be used for each file type must be
registered in advance by pressing the "Input file extension" button.
*
Output file type
You can select from PDF, TIFF, SXF (.p21), SXF (.sfc),
HPGL.
There is an "Output type" tab on the left side of the main screen, and
you can change the output file type by switching this.
(2) Settings in
the setting dialog
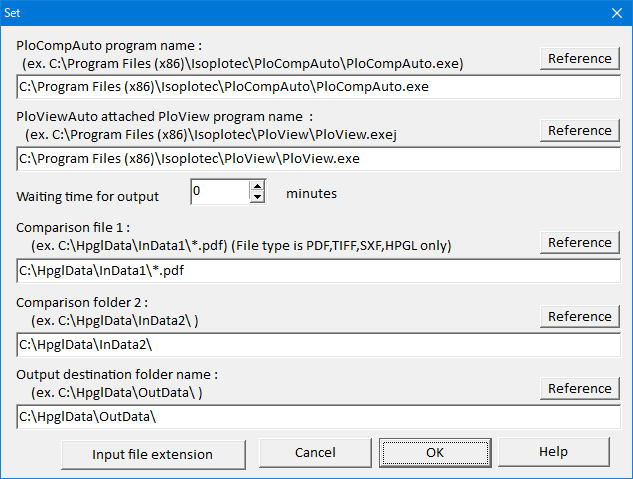
Press the "Set" button on the main screen.
"PloCompAuto program name(ex. C:\Program Files
(x86)\Isoplotec\PloCompAuto\PloCompAuto.exe)":
Specify the program name of
PloCompAuto that PloCVAuto starts.
Please specify with the full path (folder
name + file name + extension).
"PloViewAuto attached PloView program
name (ex. C:\Program Files (x86)\Isoplotec\PloView\PloVie.exe)":
Specify
the program name of the automatic output special specification version PloView
that PloCVAuto starts.
Please specify with the full path (folder name + file
name + extension).
“Waiting time for output”:
The processing
interval (interval to go to see if the input files have finished being generated
in the folder). 0 minutes is internally set to 2 seconds. 0 minutes is good for
testing, but it wastes CPU in actual operation, so it is recommended to make it
longer.
---------------------------------------------------------
<Drawing
comparison settings between folders>
Compare drawings with the same
file name in two folders, and make settings to output the changed area. Searches
for a file name that matches comparison file name 1, searches for a file with
the same name in comparison folder name 2, compares them, and outputs them to
the output destination folder.
“Comparison file 1 (ex.
C:\HpglData\InData1\*.pdf)”:
Specify the file name to be compared. Please
specify with the full path (folder name + file name + extension). Filenames can
use wildcards (represented by the character "*", where any character is found to
match). Please specify extensions for PDF, TIFF, SXF (.p21), sxf (.sfc), and
HPGL registered by pressing the "Input file extension"
button.
“Comparison folder 2 (ex.
C:\HpglData\InData2\)”:
Specify the name of the folder that contains the
files to be compared.
“Output destination folder name (ex.
C:\HpglData\OutData\)”:
Specify the name of the folder that contains the
output file. The output file name is the name of the input file with an
extension according to the output
type.
---------------------------------------------------------
"Input
file extension":
When you press this button, "Input file extension
setting" dialog is displayed.
Associates file extensions with file
types.
The extension "." is not required for specification.
When
specifying multiple extensions for the same file type, separate the extensions
with ";".
Example: hgl;prn;hpg
If you want to specify a file without
extension, please make it blank.
Example: hgl;;hpg
Return to Index |
|
|
| Input/output files |
|
(1) Input file
* Maximum file size that can be processed
The
maximum capacity of one input file that can be processed is about 1.8 GB as the
capacity of the input file expanded in the memory of the CPU. This is due to the
limitation of 32bit programs. This capacity is not the file size. The
relationship between file size and memory capacity varies depending on the file
format and data structure, so it is difficult to generalize.
In particular,
when PloView reads a PDF file, if the characters are filled with bag-like
characters made up of fine polygons of Windows, it will consume a lot of memory
if the number of characters is large, so be careful.
Be sure to check whether
it can be processed with the maximum data capacity file you have before putting
it into practical use.
Reference: Output example
Used PC: DELL
Inspiron Desktop 3668
CPU: i5-7400, Memory: 8GB, OS:
Windows10
| |
Drawing
type |
page
count |
drawing
size |
Component |
PDF input
File size |
HPGL input
File size |
processing
time |
| Case 1 |
Structural
drawing |
125 |
A2 |
Character
line |
16.4MB |
30.8MB |
About
13 minutes |
| Case 2 |
Wiring
drawing |
192 |
A4 |
line |
9.1MB |
18.1MB |
About
10
minutes |
* Input file type
Input file types are PDF, TIFF,
SXF(.p21), SXF(.sfc), HPGL, and are multi-page files.
Please register the
extension for each file type of the input file by pressing the "Input file
extension" button in the setting dialog.
An error will occur if a file with
an unregistered extension is entered.
*Insert input file
For the input
files, prepare two files with the same file name as the comparison source and
the comparison destination, and put them in the "Comparison file 1" folder and
"Comparison folder 2" of the setting dialog.
Input files can also be entered
using Explorer or other applications.
It can be before starting PloCVAuto or
while it is running.
After
processing is complete, the input file is automatically deleted.
* Input file page conditions for
comparison
Since the input file is a multi-page file, multiple pages exist in
one file.
The two files to be compared must have the same number of
pages.
Since the same pages are compared, if the number of pages is not the
same, and if there is no page in either file, the page will not be compared and
the page will not be output.
If a page is deleted or added by drawing change,
the page number of the same drawing will be shifted from the other file.
To
avoid this, when you delete a page, do not delete it, but make it blank (no
graphics).
When adding a page, please insert a blank page on the same page of
the other party's file.
Automatically searches for an input file with the
same name as the file set in "Comparison file 1" in the setting dialog, and
outputs the file if the same name is in "Comparison folder 2".
You can use
wildcards (any character string is detected in place of the "*" character) in
the file name of "Comparison File 1".
Example: C:\HpglData\InData\*.hgl
In this case the folder name is "C:\HpglData\InData\"
Search for files with all file names and the extension ".hgl".
(2) Output file
Compares the same
pages of the two input files, and outputs a file with cloud marks in the changed
parts.
The output file type will be the type selected in "Output type" on the
main screen.
The output file types are PDF, TIFF, SXF(.p21), SXF(.sfc), HPGL,
and are multi-page files.
The output file name is as follows.
PDF
: input file name.pdf
TIFF : input file name.tif
SXF(.p21) :
Input file name.p21
SXF(.sfc) : input file name.sfc
HPGL :
Input file name.hgl
The output destination will be the folder set in "Output
destination folder name" in the setting dialog.
Return to Index |
| |
|
| Standby output |
|
When this button is pressed, the folder containing "comparison file 1" is
periodically monitored, and if a file is entered, it searches for the same file
name in "comparison folder 2", and if so, divides the two files into pages.
After that, the drawings are compared for each page, and a multi-page file that
combines each page into one file is output to the "output folder". After
completion, it will automatically delete the two input files it processed. Then
go back to the beginning and repeat. If the file does not exist, wait for the
waiting time.
input file
The input file name is the file in "Comparison
file 1" and "Comparison folder 2" by pressing the "Set" button.
A wild card
"*" can be specified for the file name of "comparison file 1".
Example
Comparison file 1 C:\HpglData\InData1\*.hgl
Comparison folder 2 C:\HpglData\InData2\
The work of copying the input file to the folder
containing "comparison file 1" and "comparison folder 2" can be done using
Explorer or another dedicated application for copying. You can copy this input
file before starting PloCVAuto, or you can start PloCVAuto and do it during
"standby output".
The input file will disappear after the standby output, so please copy the input file to another folder in advance.
The output condition settings are the same as the previous
output conditions. If you want to change the conditions, press the "Set" button
in advance to set them. Also, change the settings on the PloCompAuto, PloComp,
and PloView side in advance according to the “Ready for use” in Section 3, and
confirm that the data can be output normally.
The output destination of
the output file is as follows.
It can be created under the folder specified
in "Output destination folder name" in the setting dialog.
The output file
name is the name of the input file, and the extension is attached according to
the "output type" on the main screen as follows.
PDF : input
file name.pdf
TIFF : input file name.tif
SXF(.p21) :
Input file name.p21
SXF(.sfc) : input file name.sfc
HPGL
: Input file name.hgl
Press the "End" button to stop standby
output.
Return to Index |
| |
|
|
Error file |
|
If an error occurs while each program is processing, an error message will be
written to the Log file shown below.
* PloCVAuto
Log
file
C:\Users\<username>\AppData\Local\Isoplotec\PloCVAuto\Error.txt
C:\Users\<username>\AppData\Local\Isoplotec\PloCVAuto\Error2.txt
However, <username> is your Windows account name. same as
below.
When writing an error message, if the FileSize of Error.txt is
greater than 100KB, copy the content of Error.txt to Error.txt2, then empty
Error.txt before writing.
Format of Log file Error.txt
Error occurrence date time; Input file name; Error details
Example:
2023/03/05 16:19:52 demopwb.pdf Compared file count is not
the same ! Temp1=5 Temp2=4
* PloView
Log
file
C:\Users\<username>\AppData\Local\Isoplotec\PloView\Error.txt
Format
of Log file Error.txt
Error occurrence date time; Error occurrence input drawing
file name; Error details
Example:
2002/01/19 16:19:52 C:\HpglData\DEMO.hgl HPGL data error
count=237
*
PloComp
Log
file:
C:\Users\<username>\AppData\Local\Isoplotec\PloComp\Compar1.log
C:\Users\<username>\AppData\Local\Isoplotec\PloComp\Compar2.log
Format
of Log file “Compar2.log”
Number of changed areas; Processing time (year/month/hour/minute/second);
file name of comparison file 1
Example:
5; 2010/07/02 10:10:14; C:\CadWB\aPltOut\demo1.hgl
52; 2010/07/02 10:11:05; C:\CadWB\aPltOut\demo2.hgl
21; 2010/07/02 10:15:26; C:\CadWB\aPltOut\demo3.hgl
The Log file
“Compar1.log” has only one line of the latest result.
PloCompAuto empties the
“Compar2.log” file before starting processing.
Return to Index |
|
|
|
Operating conditions
|
|
1. PloCVAuto Ver.12.0 Operating conditions
Personal computer with Intel compatible CPU
* Free memory: 3GB or more
* Free hard disk space: 10 GB or more
* Screen resolution: 1024 dots x 768 dots or more
* OS: Windows 7, 8, 10, 11 32Bit, 64Bit
*It is necessary to install some kind of printer driver.
A high-resolution printer driver is required to read PDF
files.
* The following software must be licensed and installed.
PloCVAuto
Ver.12.00
PloCompAuto
Ver.11.01 or higher
PloComp with PloCompAuto Ver.11.01 or
higher
PloView with PloViewAuto Ver.11.01
or higher
* Maximum file size that can be processed
There is a limit to the maximum capacity of one input file
that can be processed.
Please refer to the case study.
Be sure to process the file with the largest data volume
that the customer has before it becomes practical
Please confirm if it is possible.
2. Supported OS and maintenance for each PloCVAuto version

Return to Index |
|
|
|
Licensing fee
|
|
PloCVAuto Licensing fee free
However, in order to operate PloCVAuto, it is necessary to obtain the following license and install it.
Product name License fee
PloCompAuto 950.00 US$ / license
PloViewAuto 950.00 US$ / license
note:
PloCompAuto comes with the automatic output special version PloComp
Ver.12.0.
PloViewAuto comes with the automatic output special version PloView
Ver.12.0.
Return to Index |
|
|
|
Flow to trial, order, and use |
|
1. trial
Please download the product from this HP. The product is compressed into a ZIP file, so
please decompress it with appropriate decompression software. There is
a file called Readme.txt in the unzipped file, and please read it carefully
as it describes the product overview, installation method, uninstallation
method, license agreement, license fee and protection cancellation, contact
information, and version upgrade history. And there is a file called SetupPloCVAutoE.exe
in the unzipped file, so you can install it by double-clicking it in Explorer.
2. How to order PloCompAuto and PloViewAuto
Click here for PloCompAuto
Click here for PloViewAuto
Return to Index |
| |
|
|
| Regular preparation |
Please install the following necessary programs in advance.
(1)
PloCVAuto
(2) PloCompAuto
(3) PloComp attached to PloCompAuto
(4)
PloView attached to PloViewAuto
To use PloCVAuto, prepare in a regular way.
The process flow is as follows.
Prepare a sample file in Step-1.
From Step-2 to Step-4, set each program
manually and output.
Set PloCVAuto in Step-5 and check if automatic output
works normally.
After that, you can use PloCVAuto just by putting your file
in the input folder.
---------------------------------------------------------
*Sample
file
When PloCVAuto is installed, sample files are included below.
(1)
Comparison source multi-page PDF file 1
C:\HpglData\Data\demopwb1.pdf
(2) Comparison target multi-page PDF file
2
C:\HpglData\Data\demopwb2.pdf
(3) Batch file that copies (1) to
(4) and (2) to (5) to the file name "demopwb.pdf"
C:\HpglData\Data\CopyFileDataToData1_2.bat
(4) Folder containing input
file 1 (comparison source)
C:\HpglData\InData1
(5) Folder containing
input file 2 (comparison target)
C:\HpglData\InData2
(6) Folder
containing output files
C:\HpglData\OutData
*Setting
method
The setting values in red
for each program are mandatory.
The set values in
black can be changed according to the customer's wishes.
Step-1・・・Copy
the sample file to the input folder
Double-click the following batch file
in Explorer.
C:\HpglData\Data\CopyFileDataToData1_2.bat
Confirm that
there are files below, and open them with Adobe Acrobat Reader.
C:\HpglData\InData1\demopwb.pdf C:\HpglData\InData2\demopwb.pdf
Page1 Page1
Page2 Page2
Page3 Page3
Step-2・・・Page division with PloView
(1) Start PloView
(2) Select
the "File" "Open" menu
"Kind of File" to "PDF(*.pdf)"
"Edit" to "OFF"
"Multi Page" to
"ON"
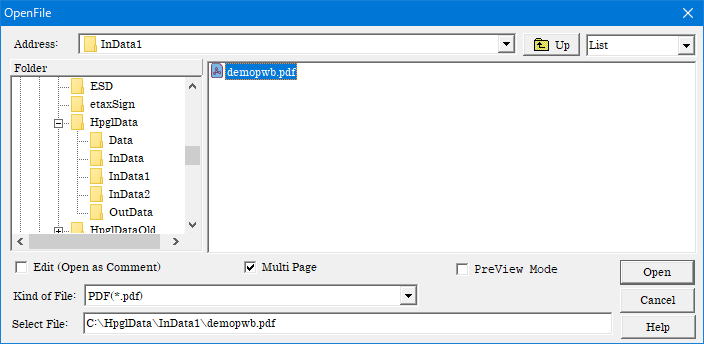
Open multi-page PDF file 1
"C:\HpglData\InData1\demopwb.pdf".
(3) Select "Output" "Printer, Plotter" menu
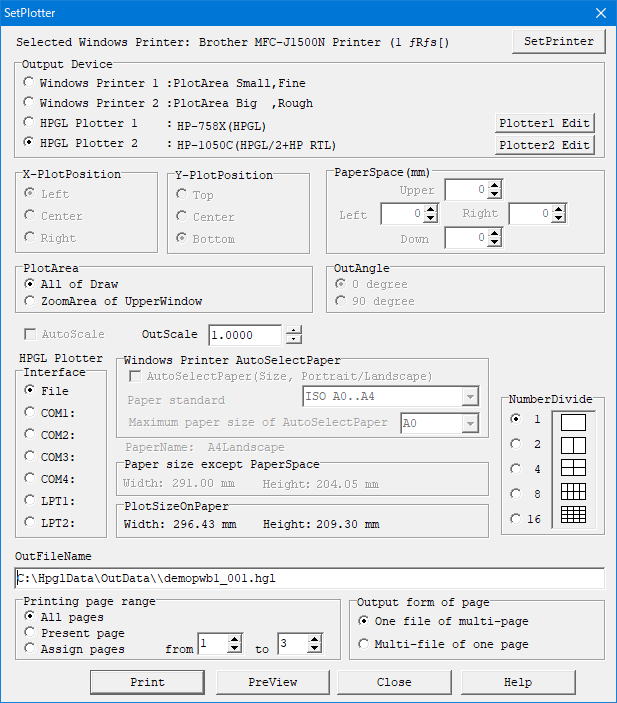
"Output Device" to "HPGL Plotter2"
Press the "Plotter2
Edit" button and set "#11 HPGL origin position" to "2"
"OutScale" to
"1.0"
"Output form of page" to "One page multi-file"
Specify "OutFileName" below
C:\HpglData\OutData\demopwb1.hgl
Press the "Print" button to get a
one-page HPGL file.
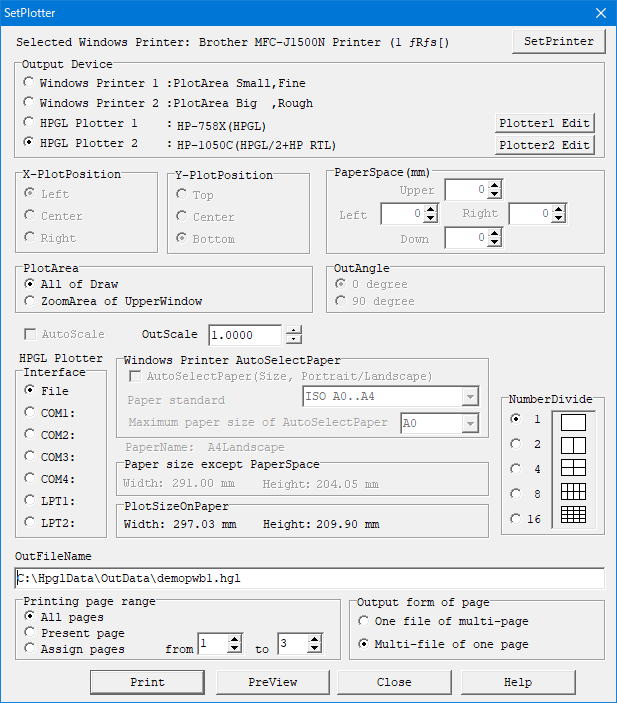
You have the following files:
C:\HpglData\OutData\demopwb1_001.hgl
C:\HpglData\OutData\demopwb1_002.hgl
C:\HpglData\OutData\demopwb1_003.hgl
(4) Perform the same operations
(2) and (3) for multi-page PDF file 2 shown below.
The file name to be
opened in (2) is "C:\HpglData\InData2\demopwb.pdf"
The output file name
in (3) is "C:\HpglData\OutData\demopwb2.hgl"
The following files are
created.
C:\HpglData\OutData\demopwb1_001.hgl
C:\HpglData\OutData\demopwb1_002.hgl
C:\HpglData\OutData\demopwb1_003.hgl
C:\HpglData\OutData\demopwb2_001.hgl
C:\HpglData\OutData\demopwb2_002.hgl
C:\HpglData\OutData\demopwb2_003.hgl
Step-3・・・Drawing comparison with
PloComp
(1) Start PloComp
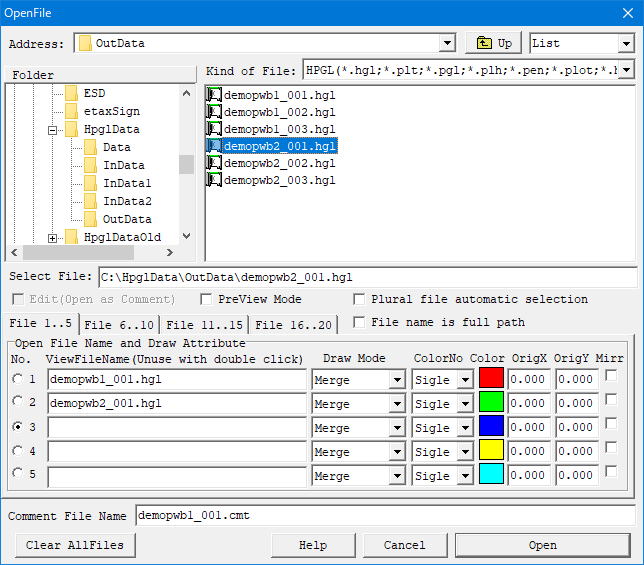
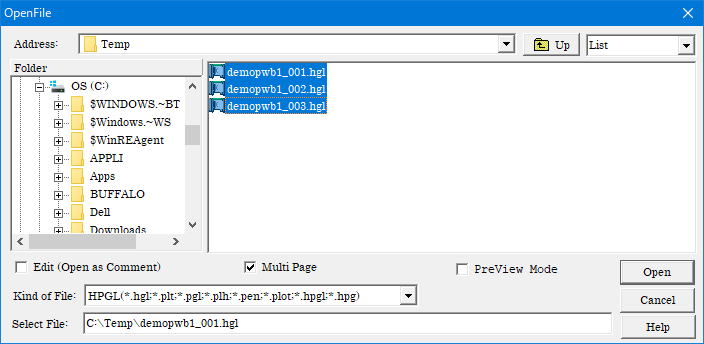
(2) Select the "File" "Open" menu
"Edit" to "OFF"
Open the files with the same pages (same after "_00") of
the "demopwb1" and "demopwb2" files output in Step-2.
For example, the
file for the first page is as follows.
"demopwb_001.hgl" and
"demopwb2_001.hgl"
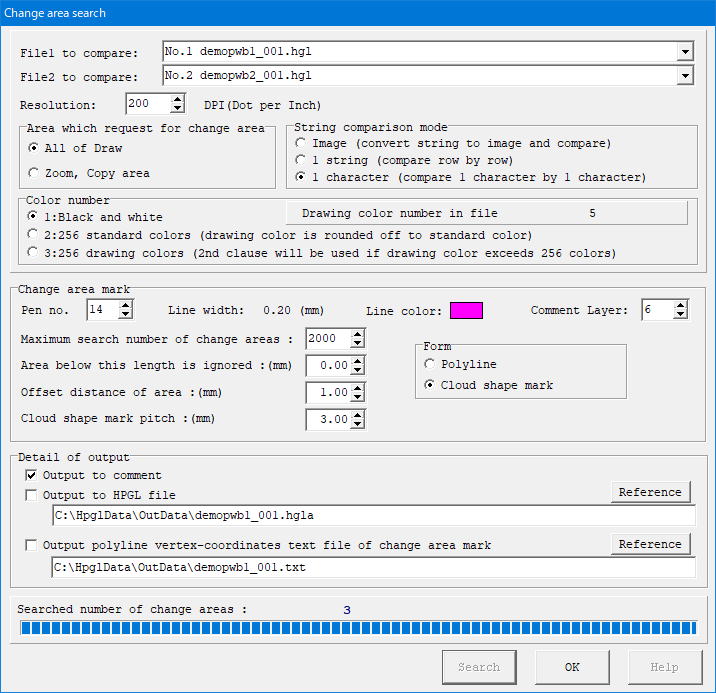
(3) Compare drawings using the "Request" and "Change Area" menus.

(4) Select "Output" "Printer, Plotter" menu
"OutputDevice" to "HPGL Plotter2"
Press the "Plotter2 Edit"
button and set "#11 HPGL Origin" to "2"
"OutScale" to "1.0"
Specify the "output file name" below
C:\Temp\demopwb1_001.hgl
Press the "Print" button to get a one-page HPGL
file.

You have the following files:
C:\Temp\demopwb1_001.hgl
(5)
Repeat the same operations (2), (3) and (4) for the remaining two pages.
The following files can be created.
C:\Temp\demopwb1_001.hgl
C:\Temp\demopwb1_002.hgl
C:\Temp\demopwb1_003.hgl
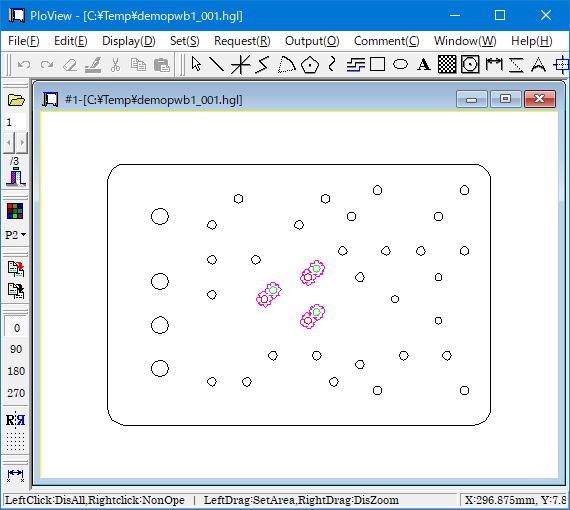
Step-4・・・Combine files with
PloView
(1) Start PloView
(2) Select the "File" "Open" menu
"Edit" to "OFF"
"Kind of File" to "HPGL"
Folder to "C:\Temp"
While holding down the Ctrl key or Shift key, use the mouse to select and open
all the files output in Step-3 (5).
(3) Select "Output" "PDF" menu
"Paper name" to "AutoPaperSelect"
"OutScale" to "1.0"
Set "Layer output" to "Pen Color", or "None" if layer
output is not required
Change "Add PDF note annotation to the cloud mark
closed loop" to "Do not add"
"Outpu form of page" to "One file of multi-page"
"PDF color
operator" to "CMYK (overwrite)"
"PDF Output
File Name" is "C:\HpglData\OutData\demopwb1_001.pdf"
Press the "OK"
button to output.
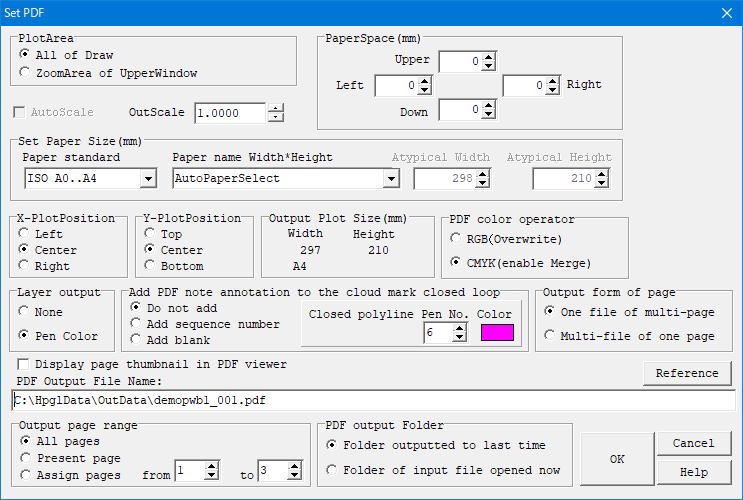
The output file "C:\HpglData\OutData\demopwb1_001.pdf" is created.
Open this file with Adobe Acrobat Reader.
On each page, you can check the
changed parts of the old and new drawings in different colors, and you can also
check the cloud mark in that place.
Note: To check mixed colors in AcrobatReader, start AcrobatReader,
select the Edit-Preferences menu, select "Page Display" under Category, and set
"Use Overprint Preview" to "Automatic" or "Always ”.
(4) Select "Output" "TIFF" menu
"Paper name" to "AutoPaperSelect"
"OutScale" to "1.0"
"Output form
of page" to "One file of multi-page"
"File
type" and "Color" are set to black and white, but it is also possible to switch
to color
"TIFF Image Output File Name" is
"C:\HpglData\OutData\demopwb1_001.tif"
Press the "OK" button to
output.
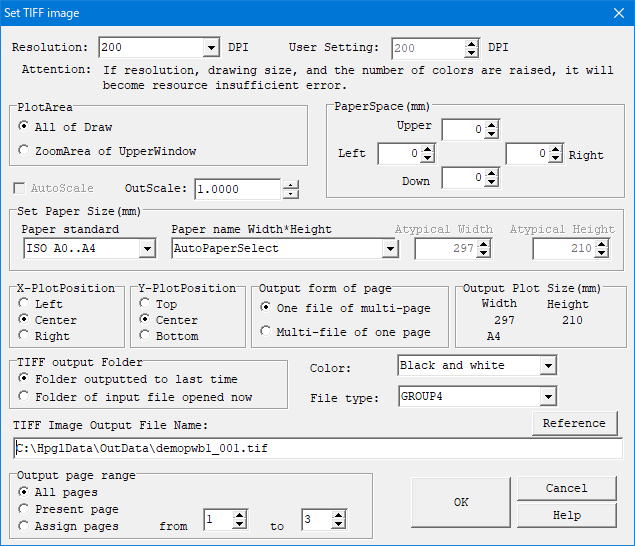
An output file "C:\HpglData\OutData\demopwb1_001.tif" is created.
To
check this file, open it with PloView after completing (5) and (6).
You
can check the cloud marks on the changed parts of the old and new drawings on
each page
(5) Select "Output" "SXF" menu
"OutScale" to "1.0"
"Output File Name" is "C:\HpglData\OutData\demopwb1_001.p21"
Press the
"OK" button to output.

The output file "C:\HpglData\OutData\demopwb1_001.p21" is created.
To
check this file, open it with PloView after completion of (6).
Select the
"Set" "Pen" menu and set "Line drawing mode" to "Mixed color".
You can
check the changed parts of the old and new drawings on each page with different
colors, and you can check the cloud mark in that place.
(6) Select
"Output" "Printer, Plotter" menu
"Output Device" to "HPGL Plotter2"
Press the "Plotter2 Edit"
button and change "#11 HPGL Orogin" to "2"
"OutScale" to "1.0"
"Output form of page" to "One file of multi-page"
Specify "OutFilename" below
"C:\HpglData\OutData\\demopwb1_001.hgl"
Press the "Print" button to get a
one-page HPGL file.
An output file "C:\HpglData\OutData\demopwb1_001.hgl" is created.
Open this file with PloView.
You can check the changed parts of the old
and new drawings in different colors on each page, and you can also check the
cloud mark in that place.
Step-5・・・Set PloCVAuto and check if it works
normally
(1) Copy the sample file to the input folder using the following
method.
Double-click the following batch file in Explorer.
C:\HpglData\Data\CopyFileDataToData1_2.bat
Please confirm that the
following files exist.
C:\HpglData\InData1\demopwb.pdf
C:\HpglData\InData2\demopwb.pdf
(2) Start PloCVAuto
(3) Press the “Set” button.
Check if the "PloCompAuto program name" file
exists
Check if the file of "PloViewAuto attached PloView program name"
exists
Set "Waiting time for output"
Initial value is 1
minute.
If you set it to 0 minutes, it will wait for 2 seconds.
0 minutes is good for testing, but it wastes CPU in actual operation, so it is
recommended to make it longer.
Check if the file exists in "Comparison
file 1"
Check if the file exists in "Comparison folder 2"
Check if
the "Output destinaion folder name" folder exists
Press the "OK" button.
(4) Select "PDF" for "Output type" on the main screen
(5) Press the "Standby
output" button
(6) Check output file
When "* End" is displayed on the main screen, press
the "End" button.
An output file "C:\HpglData\OutData\demopwb.pdf" is
created.
Open this file with Adobe Acrobat Reader.
On each page,
you can check the changed parts of the old and new drawings in different colors,
and you can also check the cloud mark in that place.
(7) Check if other
output TIFF, SXF(.p21), SXF(.sfc), HPGL are output normally
Output the
operations from (1) to (6) except for (3) by changing the "Output type" on the
main screen.
Please check the output file with PloView.
Return to Index
|
| |
|
|
Latest upgrade history
|
|
Ver.11.00 March 18, 2023
(1) New release
Ver.11.00 September 15, 2023
(2) Updated the deadline for code signing.
Ver.12.00 December 1, 2024
(1) The following new versions have been added to the required applications
●PloCVAuto Ver.12.0
●PloCompAuto Ver.12.0
●PloComp included with PloCompAuto Ver.12.0
●PloView included with PloViewAuto Ver.12.0
Return to Index
|
|
|
|
Download |
|
PloCVAuto Ver.12.00 software download
PloCompAuto and attached PloComp software Download here
PloViewAuto and attached PloView software Download here
Note:
1. To install, unzip the downloaded file and run SetupPloCVAutoE.exe according
to the
contents of the Readme.txt file.
2. Our products have been virus-checked.
What to do if you see the message "The app you're to install isn't
a Microsoft-verified app" during installation
If "Windows protected your PC" is displayed during
installation and there
is only "Do not run" button, click "Details"
and press the "Run" button.
When "Do you want to allow this app to make changes to
your device?" is displayed
at the time of installation, press "Yes" button.
3. Only the latest version is always posted on this website.
Older versions will no longer be available.
For reinstallation, please copy the downloaded file to a medium.
PloCVAuto Ver.12.0 catalog (PDF) download
Note: This file is PDF format file.
PDF viewer such as Adobe's Acrobat Reader is
required to view.
Return to Index |
|
|
|
Contact us
|
|

Return to Index
|
|
 Ver.12.0